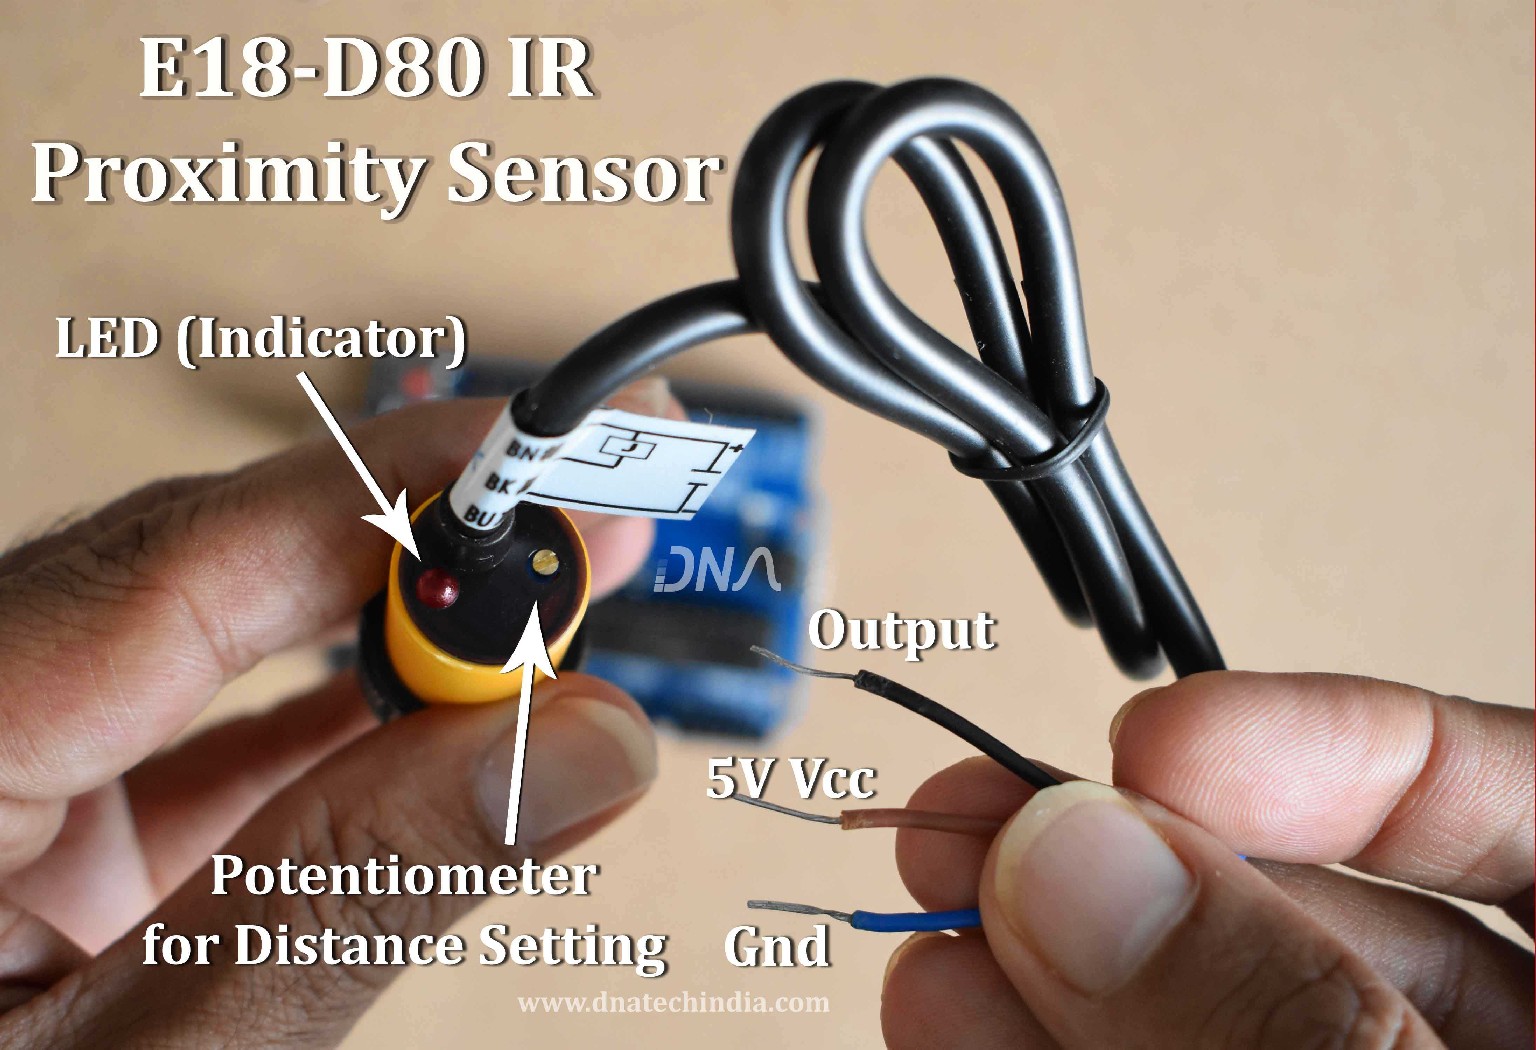
E18-D80NK is a low cost IR proximity Sensor with an adjustable range of 3 cm to 80 cm. The E18-D80 IR Proximity sensor has very less interference by visible light and can even work quite well even in sunlight.
E18-D80 is extremely easy to user IR proximity Sensor which consists of IR Transmitter and IR receiver in one module. The IR transmitter transmits modulated IR signal which is then reflected by the obstacle and then detected by the receiver. The sensor works on modulated IR so the sensor can also work in daylight.
Checkout this video where we have explained about E18-D80 IR Proximity Sensor and have shown how it can be interfaced to Relay Module as well as to Arduino UNO
Interfacing and code of E18-D80 IR proximity sensor to Arduino is given below.
Detection range of E18 Proximity Sensor is approximately 3 cm to 80 cm. This detection range is adjustable using a multi-turn screw which is located at the back of the E18 sensor. You can increase the sensing range by rotating the screw clockwise and sensing range decreases by rotating the screw counter clockwise. Since the E18 sensor uses a multi-turn potentiometer you will have to rotate quite a few times to vary sensing distance. To cover the compete range from 3 cm to 80 cm you may have to rotate the screw atleast 10-12 complete turns.
The E18-D80NK IR proximity sensor can detect object withing the set range but it cannot determine the distance of the object. So if you require exact distance of the object you will require distance sensors like ultrasonic Sensor or you can check complete range of distance sensor over here.
BUY E18-D80 IR Proximity Sensor
The E18 module operates on 5 volts and consumes around 5ma to 30ma current (without load). The output of the sensor is open collector and can sink upto 100ma of current. So the E18 IR sensor module can directly drive a 5 volt cube relay no need of external relay driver circuit. Normally the output of the E18 IR Proximity sensor is HIGH (no obstacle) and then the output goes low when obstacle is detected. A red LED is present at the back of the E18 sensor and is turned ON when an obstacle is detected.
The E18 Sensor body is Cylindrical in shape with Threaded body along with which two Nuts are provided for easy mounting. The Sensor can easily be mounted in a 19mm hole.
Before using the E18 D80NK IR proximity sensor do not forget to check the pinout diagram as the color coding is a bit different as compared to other sensors. Improper wiring can damage the E18 D80 IR Sensor.

Wiring Configuration of E18-D80 Sensor
-
Brown: +5 Volts Vcc
-
Brown: Gnd
-
Black: Output
Advantages of E18-D80 IR Proximity Sensor
-
Works on 5 volts so can be interfaced to any 5 volt Microcontroller
-
Digital Output (High - LOW) so very easy to interface to any circuit
-
LED output to Indicate if object Detected
-
High variable Sensing Distance (3 cm to 80 cm)
-
Works quite well in Normal light and even in Sunlight.
-
Cylindrical in shape with Threaded body and 2 nuts provided easy mounting.
Features of E18-D80 Sensor
-
Working Voltage: 5 Volts
-
Sensing Distance: 3 cm to 80 cm Adjustable
-
Output: NPN Normally High (Digital)
-
Current Consumption: 5ma to 30ma
-
Dimension: 1.7 cm x 4.5 cm (dia x length)
Projects that can be done using E18-D80 IR Proximity Sensor
-
Object Counter in Industry
-
Person Counter for Home Automation
-
Automatic Railway Gate control
-
Obstacle Avoiding Robot
-
Automatic Hand Sanitizer
-
Reverse Car Parking
-
RPM Meter
Interfacing E18-D80 Sensor to Arduino UNO
E18-D80 Sensor has digital output and also works on 5 volts so it can be directly interfaced to Arduino Uno or Nano or Mega. It can also be interfaced to ESP32 and ESP8266 nodemcu.
We have written a small code where when an obstacle is detected the Relay will Turn ON for 1 second. You can check the practical video for its working in above video.
const int e18_sensor = 3;
const int relay_pin = 13;
void setup() {
Serial.begin(9600);
pinMode (relay_pin, OUTPUT);
pinMode (e18_sensor, INPUT);
digitalWrite (relay_pin, HIGH);
Serial.println ("E18-D80NK IR Proximity Sensor Module Test by DNA Solutions, www.dnatechindia.com");
}void loop() {
// put your main code here, to run repeatedly
if(digitalRead(e18_sensor)==LOW){
//IF sensor output is LOW (obstacle detected) write code over here
digitalWrite (relay_pin, LOW);
delay (1000);
digitalWrite (relay_pin, HIGH);
while(digitalRead(e18_sensor)==LOW); //Wait till Sensor Pin Goes HIGH Again
}
}


